
A Six Minute Primer
When many organizations “go Lean” or “‘do’ Six Sigma”, they study the concepts, they hold some kaizen blitzes,  get some early success, and then plateau. This can be frustrating – they signed on for the “continuous” and the “improvement.”
One contributing factor is that organizations acquire the tools, but don’t coordinate their use.
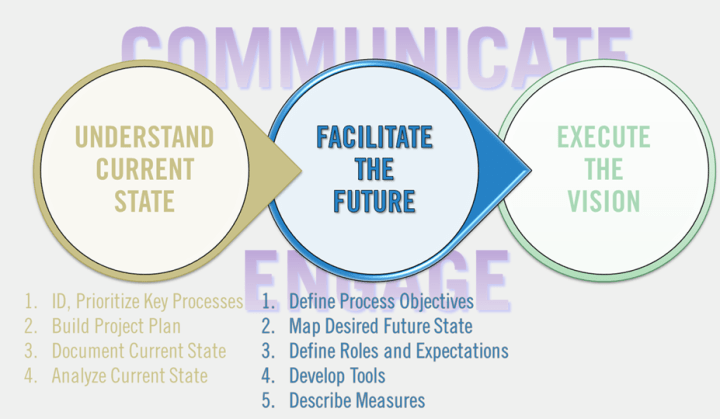
I favor a three-phase process improvement model that is “agnostic” to the actual improvement philosophy (Lean, Six Sigma, StoneForge, etc): Whatever tool(s) you prefer, that’s great. This model is a structure to scope, plan, and execute any improvement.
In a previous post, I detailed four steps to complete the first phase, Understanding the Current State. Below is a breakdown of the second phase, Facilitating the Future State. (The final phase, Executing the Vision, will be reviewed along with some thoughts on “communication” and “engagement” throughout the model).
 Current State Review
Those first four steps give shape to the improvement project, and build agreement around priorities moving forward:
- Identify and Prioritize Key Processes
There are always more areas to improve than there are resources to do so. Clarify the cause(s) of pain and decide what to chase first. Pursue the biggest impact items, rather than simply attacking “low hanging fruit”.
- Build a Project Plan
It will be iterative, but even a straw-man schedule (representing all three phases) helps get sponsors and resources on board (for both time and funding).
- Document the Current State
Strap on your toolbelt. The first two steps get the right people in the right place; now, they can use their preferred methodologies to gather primary information. Then:
- Analyze the Current State
Find meaning in quantitative and qualitative data. Understand and prioritize process disconnects. Brainstorm (but don’t attempt to overdevelop) some vague solutions, and gain approval to move forward on those solutions.
Facilitate the Future State
The purpose of this phase is as simple as it is grand: To devise a solution that will meet both customer requirements and business goals. Create the New Normal.
The word “Facilitate” is specifically chosen, rather than “Design”, and not just for alliteration. “Facilitating” something means not just making it happen, but to making it easier. A “design” never has to leave the page.
“Designing” the Future State connotes an image of brainiacs (and/or consultants) holed up in a war room, doors closed except for coffee runs and Jimmy John’s deliveries. Weeks later, they emerge, brandishing the “solution”. These tend to end up in very expensive binders on some vice president’s desk, and never implemented.
“Facilitating” the Future embraces a more collaborative approach, one that focuses on both customer and employee needs. The best projects use resources that represent both all relevant functions (including internal customers and suppliers) and multiple organizational levels.
Define Future Needs
This sets the scope and constraints for this phase. The team needs the overriding process (and improvement) objectives as well as any limiting factors they will face.
 Early in this phase, the group should collaborate to document key “Process Assumptions” they’re making. They should consider what is happening external to the project, and what can reasonably happen in the future, that may impact the process.
This is not “risk management”, rather it’s a reflection of the potential success factors outside of the team’s control. Resist the urge to create contingency plans. Just list.
The other key output is the start of a “Process Specification”. Similar to a SIPOC analysis, this also includes process objectives (making it an “OSIPOC”?) At this point, there are no process steps to list in the “P” section – that comes later.
Design the Future State
There’s no One Best Way to design a future state, but here’s a method that is both successful and fun. Break the team into small groups, turn them loose with Post-It notes and butcher paper, and allow them to develop as many different solutions as they can. A true brainstorming exercise – developing first, without judgment or criticism.
- Challenge them to map the best future state process flow they can (in about 30 minutes or so)
It might be helpful to review “world class” principles (e.g., reduce bureaucracy, minimize non-value-added activites) - Review all designs as a group, allowing each team to articulate what is distinctive and good about their solution
- Put them back in groups and do it again.
Not to refine what they did, but to start from scratch. (They will groan, but eventually will draw something) - Hold another Show-and-Tell, and then
- Do it again.
They will insist it’s impossible to create something unique at this point; usually, though, third time’s the charm
Focus on the activities that need to be done, not the roles. You can always create and combine roles through the process.
 Take a break (of a few days, if possible), and let them play with all the different iterations. Bring them back together to create Frankenstein versions – grade them against the process objectives, and select the most effiective and efficient design.
Define Roles
The design focused on the process steps and the work itself. Now, determine what knowledge and skills are needed to accomplish each step. Look for areas and opportunities to combine and cluster the work.
Don’t be afraid to challenge existing roles and definitions. This may well mean new titles, functions, and reporting lines.
Define the roles (and set expectations) by clearly articulating the behaviors needed. Good processes should be adaptable; usually “adaptability” means employees applying good judgment. If expectations are clarified, and the process objectives well-defined, this should follow.
Develop Tools
New activities, new positions… Why not some shiny new resources to go along with it?
Tools can be anything from worksheets to software to SOPs. They don’t have to be fancy – they just have to be effective and efficient. In fact, during any “beta” or pilot period, it is usually a good idea to use simpler, interim tools.
Develop Appropriate Measures
This can be tricky. It can also be really complicated or as simple as you let it. Processes are measured for a few reasons: first, to ensure the customer’s needs are being met by the process; additionally, to have data to fuel improvement efforts.
You won’t want to necessarily measure every step, although you will want to develop some in-process ways to prevent bad outputs from being passed on. Measures should look at all three tenets of good process: Its effectiveness (generally quality measures), its efficiency (cost and cycle time), and its adaptability (what gets kicked out or forced inappropriately).
Separate defining the measures from the collection method. Determine what information is truly needed without initially worrying about how to get it.
Bringing It All Together
At this point, the team has a good blueprint for the future: A well-thought-out series of process steps, clear expectations for those who will be doing them, the tools they need to succeed, and a way to determine how successful they are. It’s important to keep each step distinct – the design will be more pure if the first worry is solely about what to do, without getting concerned about how to do it. Great designs can be rejected prematurely because existing metrics don’t support them; design first, then work the rest out.
Before moving forward with implementation planning, present the design to key stakeholders. Rather than walking them through each step – and risking getting lost in details – create an “As-Is/To-Be” report. List existing problems, pain points, and major activities in the Current State, and then describe what the future will look like. All bluebirds and sunshine, no doubt.
During the design process, and during the As-Is/To-Be report out, expect resistance. Handling that will be discussed in a future post.